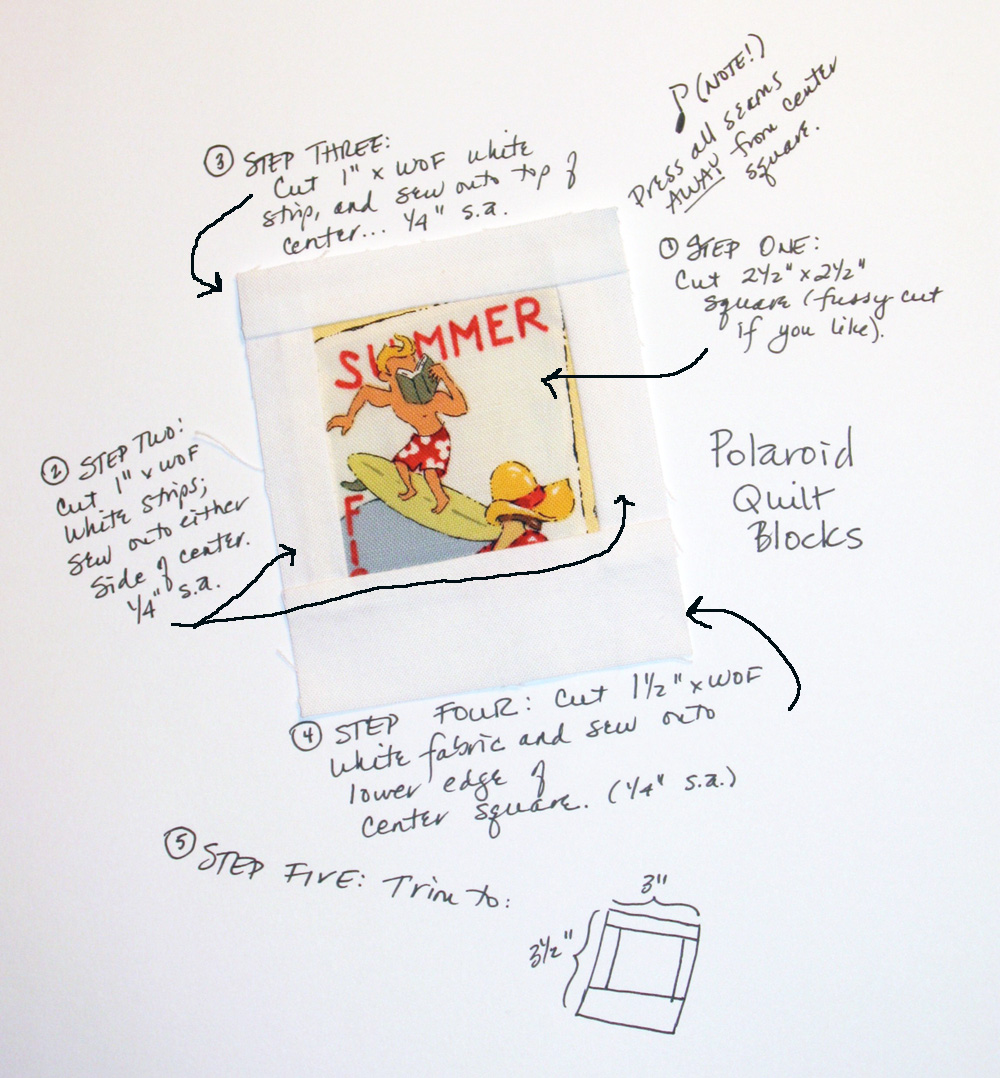
Here's a quick and easy way to finish your Polaroid blocks, while adding a neat shading effect. Like so (and how stinking cute is that pug in his swimwear?!):
This also makes the blocks 4 1/2" square, and I find square is easier to work with when making something like a pillow.
If you don't know how to make the Polaroid blocks, they're super fast and fun. Use this handy diagram by Occasional Piece. When I make them, I like to cut long strips of the white and chain piece. It makes the blocks go so much faster!
Once you've got your Polaroid blocks trimmed down to size, it's time to start adding the borders. When I comes to sewing, I like to make things as efficient as possible. So instead of making a bunch of the shadow borders individually, carefully cutting out a ton of pieces and trying to neatly sew 1" seams, I sewed two big strips together, then sliced off how many finished strips I needed. This is what I had left over after making my blocks, just to illustrate the idea.
Shadow
Now here is where I'm gonna leave you to your own devices to do the math. But it's easy, I promise! You need 1" strips to sew on your Polaroid, so cut out strips the same length as the number of blocks you're making - with a little wiggle room just to be safe.
For the bottom shaded strip, cut a 1" strip of the background fabric and a 2 1/2" strip of the colour you're using for the shade.
For the side shadow strip, cut a 1" strip of the background fabric and a 3 1/2" strip of the shadow fabric.
Sew the two sets of strips together, then cut 1" strips vertically from each, as many as you need.
Sew the bottom shaded strip on the bottom of your Polaroid, then add the side strip on the right.
Background
Cut long strips of your background colour. You'll need 1" strips and 1 1/2" strips. I didn't bother doing the math, I just kept cutting as needed. Chain piece the 1" strip on the top of all your Polaroids. Cut them apart and iron the seams. Then do the same on the left side, adding the 1 1/2" strip. Cut apart, iron and you're done!
Now you can put all your blocks together for a fun pillow or mini quilt or make a ton and have an awesome lap quilt!
Oh and an addendum ... After sewing together all my Polaroid blocks and adding a border, I realized I probably should have put a strip of background on the bottom and right side to create some space next to the shadows. Next time!
Tuesday, July 5, 2016
Monday, June 20, 2016
Half way there!
Here's the latest block in the Modern HST Sampler hosted by the lovely Blossom Heart Quilts. This one is called Rockpool and I just love it!
Since this is Block #12, that also means we're half way through this quiltalong. I figured that made it a good time to gather all my blocks for a photo. Thankfully I snapped this just before a big gust of wind blew them here and there!
Blocks and bits
June's queen bee picked a colour scheme I quite adore - muted pink, coral, teal and blue. My only problem was narrowing down my choices. As usual this year, I made two blocks.
I also made two heart blocks with these Tula prints for the campaign hosted by the Orlando modern quilt guild to give heart quilts to those affected by the tragic shooting at the Pulse night club. I sent these blocks to a woman in the U.S. who offered to collect blocks and sew them into quilt tops.
I don't think I posted these two mini minis I made for the fun contest hosted by Make Modern magazine. Both are made with Alison Glass fabric and finish at 6". This was my first go at single binding and it went surprisingly well.
They now hang in front of my sewing machine with a few other favourite minis.
I also made two heart blocks with these Tula prints for the campaign hosted by the Orlando modern quilt guild to give heart quilts to those affected by the tragic shooting at the Pulse night club. I sent these blocks to a woman in the U.S. who offered to collect blocks and sew them into quilt tops.
I don't think I posted these two mini minis I made for the fun contest hosted by Make Modern magazine. Both are made with Alison Glass fabric and finish at 6". This was my first go at single binding and it went surprisingly well.
They now hang in front of my sewing machine with a few other favourite minis.
Thursday, June 16, 2016
Tutorial: Squared Summits
This is my first go at a pdf tutorial, so please excuse the low production values. But it's a neat block I wanted to share and I hope people have fun making it too. It's simple, but quite striking. I called it Squared Summits because it's a square version of the traditional Delectable Mountains block.
You can find the tutorial here.
Here are a few examples that show you just how many possibilities there are with this block. Each one looks totally different depending on the size and fabric. Here are a few examples, which I have posted previously on this blog so they may look familiar. But it is neat to see them all together to see just how many possibilities there are with this simple block.
This uses Alison Glass fabric and off-sets the blocks with narrow sashing between.
This pillow's bold colour scheme of blue and orange, white and black really sets off the blocks.
Here's another pillow with an Anna Maria Horner floral print combined with Grunge and a border.
Below are two more matching tops that will become pillows as well.
This block is super versatile and super easy. You just need to master a half-rectangle triangle. Follow my tutorial and you'll be whipping up these blocks in no time! I also included a simple calculation to make them in any size.
I want to give a nod to Wendy on Instagram (@wens_was_here) for inspiring this tutorial. I saw a beautiful pillow she made with this block and I immediately made two! I had the math a bit wrong on that first go, and set to figuring it out. Not just for that four-block pillow, but for any size. And you can see I've kinda been hooked on making them in every size and configuration since! I hope you have fun with it too.
***If you do make these blocks, please share them on Instagram with the hashtag #squaredsummits and tag me - @johannaweidner. I'd love to see them!
You can find the tutorial here.
Here are a few examples that show you just how many possibilities there are with this block. Each one looks totally different depending on the size and fabric. Here are a few examples, which I have posted previously on this blog so they may look familiar. But it is neat to see them all together to see just how many possibilities there are with this simple block.
This uses Alison Glass fabric and off-sets the blocks with narrow sashing between.
This pillow's bold colour scheme of blue and orange, white and black really sets off the blocks.
Here's another pillow with an Anna Maria Horner floral print combined with Grunge and a border.
Below are two more matching tops that will become pillows as well.
This block is super versatile and super easy. You just need to master a half-rectangle triangle. Follow my tutorial and you'll be whipping up these blocks in no time! I also included a simple calculation to make them in any size.
I want to give a nod to Wendy on Instagram (@wens_was_here) for inspiring this tutorial. I saw a beautiful pillow she made with this block and I immediately made two! I had the math a bit wrong on that first go, and set to figuring it out. Not just for that four-block pillow, but for any size. And you can see I've kinda been hooked on making them in every size and configuration since! I hope you have fun with it too.
***If you do make these blocks, please share them on Instagram with the hashtag #squaredsummits and tag me - @johannaweidner. I'd love to see them!
Monday, June 13, 2016
52 Quilters
This week you can find me over on 52 Quilters. It's a neat social media experiment where a new quilter takes over each week. I'm very honoured to be chosen and hope I add something to the project.
I'll be posting on the blog and Instagram account - 52Quilters.
I've got a lot planned, the highlights being a tutorial and a little giveaway. I hope you'll follow along!
I'll be posting on the blog and Instagram account - 52Quilters.
I've got a lot planned, the highlights being a tutorial and a little giveaway. I hope you'll follow along!
Wednesday, June 8, 2016
Pillows to solve the world's problems
Ooh, I am in love with this pillow! And not just because I amazed myself by figuring out the blocks correctly. (My brain strains on spacial reasoning.) The combo of orange and blue, with the dark grey and white is just so wonderfully bold. And I love the dense diamond cross-hatch quilting in light blue. And really I just can't be happier than when I'm sewing with Alison Glass fabric.
For the back, I pulled from my stash this grey fabric that's so wonderfully soft to the touch. Then for fun, I added this neat Kokka deer print with a sateen feel I bought when I was in Spain for a pretty penny.
This is where I got clever. I didn't want to waste fabric making a band when half of it would be hidden inside the pillow. Instead, I sewed a strip to the back of the grey, then pulled it around front and carefully ironed the seam. I folded over about 1/4" on the top of the band and ironed it flat, and then top stitched at the bottom and top. And voila! A nice detail without wasting fabric.
It gives the pillow back a nice sturdy feel too and I'm sure I'll do this again.
For the back, I pulled from my stash this grey fabric that's so wonderfully soft to the touch. Then for fun, I added this neat Kokka deer print with a sateen feel I bought when I was in Spain for a pretty penny.
This is where I got clever. I didn't want to waste fabric making a band when half of it would be hidden inside the pillow. Instead, I sewed a strip to the back of the grey, then pulled it around front and carefully ironed the seam. I folded over about 1/4" on the top of the band and ironed it flat, and then top stitched at the bottom and top. And voila! A nice detail without wasting fabric.
It gives the pillow back a nice sturdy feel too and I'm sure I'll do this again.
Catching up
Somehow I got a block behind on the #modernHSTsampler, and then another block pattern came out. Eep. Time to get cutting!
Here is Block #10 - Faceted Stripe. It came together quickly, thanks to using the eight-at-a-time method of making HST. Next time, though, I will cut the starting squares a bit bigger than the size given. When I trim my HST, I like a little extra fabric to work with so I can trim all four sides, not just the ears. These turned out to be just the size needed, and a bit smaller in some cases.
And here's Block #11 - Starshine. I really like this one, especially with that really dark blue.
Both use the same background fabric - a light grey quilter's linen - even though it looks different in the picture. The clouds cleared for a bit for the second photo, and I think the dark fabric changed the contrast.
Here is Block #10 - Faceted Stripe. It came together quickly, thanks to using the eight-at-a-time method of making HST. Next time, though, I will cut the starting squares a bit bigger than the size given. When I trim my HST, I like a little extra fabric to work with so I can trim all four sides, not just the ears. These turned out to be just the size needed, and a bit smaller in some cases.
And here's Block #11 - Starshine. I really like this one, especially with that really dark blue.
Both use the same background fabric - a light grey quilter's linen - even though it looks different in the picture. The clouds cleared for a bit for the second photo, and I think the dark fabric changed the contrast.
Subscribe to:
Posts (Atom)