Here's a quick and easy way to finish your Polaroid blocks, while adding a neat shading effect. Like so (and how stinking cute is that pug in his swimwear?!):
This also makes the blocks 4 1/2" square, and I find square is easier to work with when making something like a pillow.
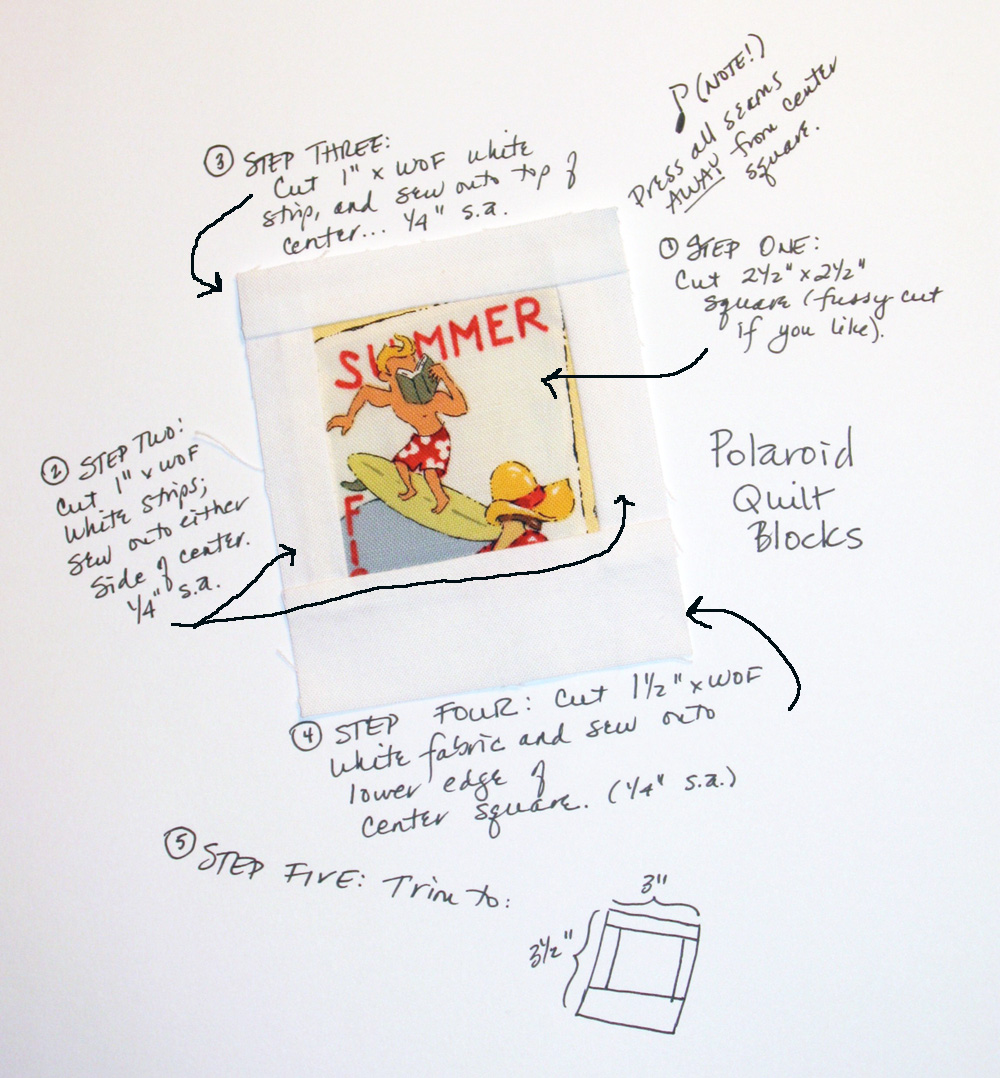
If you don't know how to make the Polaroid blocks, they're super fast and fun. Use this handy diagram by
Occasional Piece. When I make them, I like to cut long strips of the white and chain piece. It makes the blocks go so much faster!
Once you've got your Polaroid blocks trimmed down to size, it's time to start adding the borders. When I comes to sewing, I like to make things as efficient as possible. So instead of making a bunch of the shadow borders individually, carefully cutting out a ton of pieces and trying to neatly sew 1" seams, I sewed two big strips together, then sliced off how many finished strips I needed. This is what I had left over after making my blocks, just to illustrate the idea.
Shadow
Now here is where I'm gonna leave you to your own devices to do the math. But it's easy, I promise! You need 1" strips to sew on your Polaroid, so cut out strips the same length as the number of blocks you're making - with a little wiggle room just to be safe.
For the bottom shaded strip, cut a 1" strip of the background fabric and a 2 1/2" strip of the colour you're using for the shade.
For the side shadow strip, cut a 1" strip of the background fabric and a 3 1/2" strip of the shadow fabric.
Sew the two sets of strips together, then cut 1" strips vertically from each, as many as you need.
Sew the bottom shaded strip on the bottom of your Polaroid, then add the side strip on the right.
Background
Cut long strips of your background colour. You'll need 1" strips and 1 1/2" strips. I didn't bother doing the math, I just kept cutting as needed. Chain piece the 1" strip on the top of all your Polaroids. Cut them apart and iron the seams. Then do the same on the left side, adding the 1 1/2" strip. Cut apart, iron and you're done!
Now you can put all your blocks together for a fun pillow or mini quilt or make a ton and have an awesome lap quilt!
Oh and an addendum ... After sewing together all my Polaroid blocks and adding a border, I realized I probably should have put a strip of background on the bottom and right side to create some space next to the shadows. Next time!


